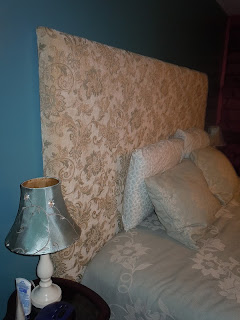
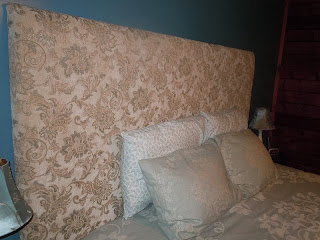
My headboard project has been in the making for months and I am so excited it is now complete.
Andrew and I got ourselves a king size bed for our 7th wedding anniversary this year and instead of buying a traditional wooden headboard, I loved the idea of making an upholstered one. I spent months researching tutorials, picking out fabric, and finding upholstery foam. I could not wait to start! Our headboard project finally started back in June when Andrew was at annual training.
It seems likes every major project I start is done while Andrew is away and my poor father always ends up taking his place. I don't think he minds though....THANKS DAD!
I had ordered my fabric, foam, and batting online (I am the queen of online shopping) and all we needed was the wood and brackets. Buddy Bee, my dad, and I gathered the rest of our supplies the day before we offically started my project.
Dad came down while Buddy Bee was napping and we started on attaching the brackets that would attach the headboard to the wall.
Dad prepping for the brackets which we would add later before mounting the headboard.
2 in. foam ready to be adhered to the board.
My Dad spraying the foam with adhesive. We would then flip the foam over and attach it to the board. When they say permanent they really do mean it. It's not easy flipping a 7 ft. piece of foam over without touching anything.
After we attached the foam we would cut off the excess board.
Buddy Bee was up from his nap so we moved the operation inside to attach the fabric.
We laid down the fabric, then the batting, and put the piece of foam and the board onto it. We then started in the middle of one side and started stapling the fabric/batting onto the back of the board.
You're dying to see what fabric I choose! I have a story to tell about it first.
I thought I needed about 3 yards of fabric for the headboard but I wanted to get extra just in case. Plus, I had a few accessories I wanted to make to match the headboard fabric. The tutorials I was reading were very iffy on giving an exact amount of fabric needed for a king headboard because it all depended on the size of your headboard so I was really unsure on how much I really did need. My plan was to get 4-5 yards to be on the safe side. Well, the orginal fabric I really loved was $39.00 a yard half off...crazy, I know! I really did not want to spend that much so I went searching online for a bargin on upholstery fabric and boy did I find it!
I found this awsome site, Fabric Guru which sells a lot of remnant fabric.
I soon fell in love with this beautiful chenille fabric but I would have to purchase the rest of the role which was 6 yards. Once I saw the price for all 6 yds. buying all of it was not a problem.
6 yards would be the same price as what 1 yard of my orginal fabric would have been.
I was so exceited and loved it even more when I saw it in person.
So, here it is!
It's a cream colored chenille with a gold and blue/teal flower pattern.
2 sides completed.
Dad working on the corners.
Here it is finished!
We had not moved into our new house yet so I did not want to attach it the wall until we moved. So, there it sat until September when were finally in our new house. My dad graciously came up when Andrew was at work and helped me attach it to the wall. Andrew misses all the fun!
This headboard is nothing to sneeze at being 7 ft wide and 4 ft. tall. And let me tell you it is HEAVY!
We mounted the headboard about 1 foot above the floor to miss an electrical outlet.
Here is the finished product which I am so excited about!


No comments:
Post a Comment